

From Chaos to Clarity: Understand Designing Android Apps with MVC, MVP, and MVVM
Unraveling the Architectural Maze for Efficient Android App Development


Introduction
The selection of an appropriate architecture plays a critical role in the success of Android app development. It sets the stage for creating applications that are robust, scalable, and easy to maintain. Among the various architectural options available, architectures like MVC (Model-View-Controller), MVP (Model-View-Presenter), and MVVM (Model-View-ViewModel) stand out for their well-structured and beneficial characteristics.
MVC architecture divides the application into three key components: the model, responsible for managing data; the view, responsible for presenting the user interface; and the controller, which acts as a mediator between the model and view. This segregation facilitates modular development, code reusability, and simplified testing.
Expanding upon MVC, MVP architecture introduces the presenter layer, facilitating communication between the model and view. The presenter acts as an intermediary, handling user interactions and updating the view accordingly. By separating responsibilities, MVP promotes maintainable code, ease of testing, and a clear separation of concerns.
MVVM architecture leverages data binding and a reactive programming approach. The model represents the data, the view displays the user interface, and the view model bridges the gap between them. Through data binding, the model and view stay synchronized, streamlining code development and enhancing application responsiveness.
Adopting well-structured architectures such as MVC, MVP, and MVVM brings several advantages to Android developers. These include improved code organization, scalability, code reusability, testability, and ultimately, an enhanced user experience. By utilizing these architectures, developers can create Android applications that are easier to maintain, extend, and adapt to evolving requirements.
Model-View-Controller (MVC)
The Model-View-Controller (MVC) is a well-established architectural pattern extensively utilized in software development, including Android app development. It aims to partition an application into three distinct components: Model, View, and Controller, each with its own set of responsibilities.
The Model component represents the data and business logic of the application. It encapsulates the data and offers methods for data manipulation and access. This component handles tasks such as data validation, database operations, and core functionality implementation.
The View component focuses on the presentation layer of the application. It encompasses the user interface (UI) and is responsible for displaying the data from the Model to the user. The View is designed to be passive and devoid of business logic. It communicates with the Model to retrieve data and manages user input and interactions.
The Controller serves as an intermediary between the Model and the View. It receives user input, translates it into appropriate actions, and updates the Model or the View accordingly. The Controller manages user interactions, makes decisions based on the input, and facilitates the flow of data between the Model and the View. It ensures that changes in one component are appropriately reflected in the others.
In the MVC pattern, user interactions start with the View, which notifies the Controller of the action taken. The Controller then updates the Model based on the action, and the Model, in turn, notifies the View of any changes. The View updates its display to present the updated data from the Model.
By segregating responsibilities into distinct components, the MVC pattern fosters code modularity, reusability, and maintainability. Each component has well-defined responsibilities, allowing for easier comprehension, testing, and modification of different parts of the application independently. This architectural pattern helps maintain a clean codebase and facilitates efficient collaboration among developers working on different aspects of the application.
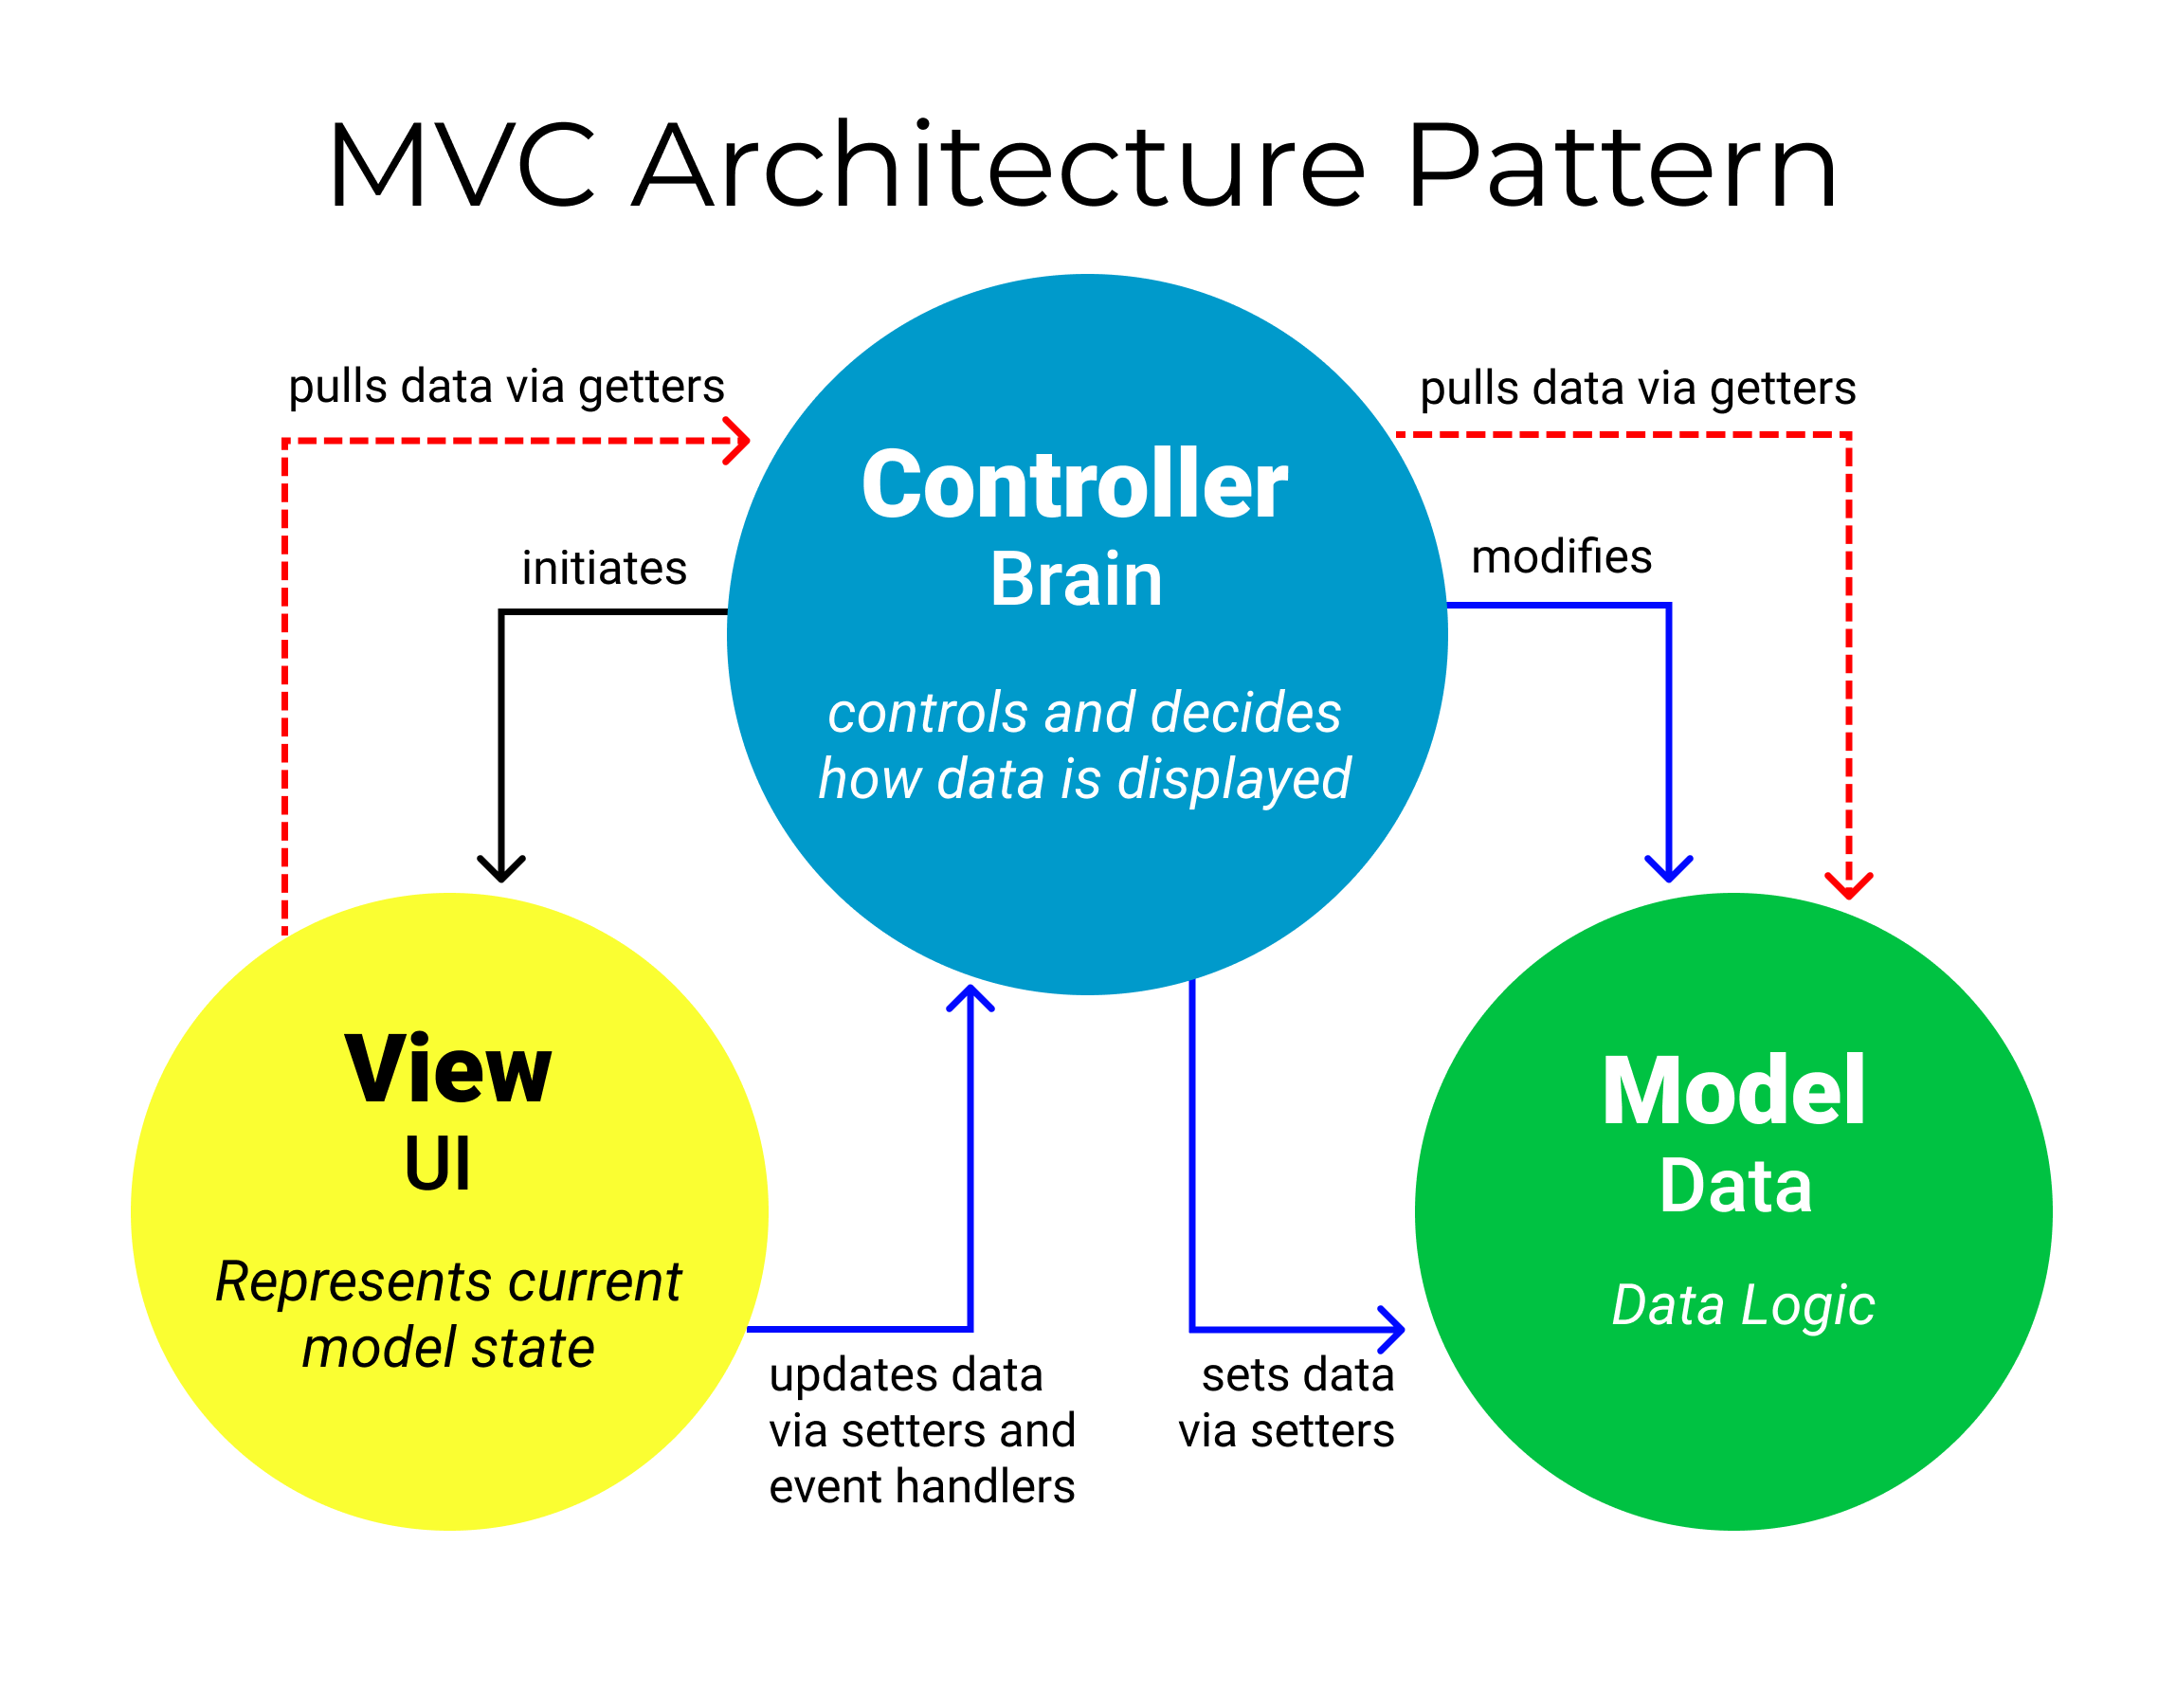
The source image is from this: https://www.freecodecamp.org/news/the-model-view-controller-pattern-mvc-architecture-and-frameworks-explained/
Let's dive into a more detailed explanation of how the Model-View-Controller (MVC) architectural pattern promotes the separation of concerns and code reusability in Android app development using Kotlin.
Model: The Model represents the data and business logic of the application. It encapsulates the data required for the user, such as the username and email. Along with the data properties, the Model may also contain methods for data manipulation and business operations.
 data class UserModel(
     var username: String,
     var email: String
 ) {
     // Additional methods for data manipulation and business logic can be added here
 }
View: The View is responsible for presenting the user interface (UI) to the user and handling user interactions. Its primary focus is on UI-related tasks and should not include any business logic. In this case, we consider a fragment as the View component.
 class UserFragment : Fragment() {
     // View-related code, including layout inflation, UI components, and event listeners

     // Method to update the UI based on the data from the Model
     private fun updateUI(userModel: UserModel) {
         // Update the UI components with the data from the UserModel
         // For example:
         usernameTextView.text = userModel.username
         emailTextView.text = userModel.email
     }
 }
Controller: The Controller acts as an intermediary between the Model and the View. It handles user actions, updates the Model, and notifies the View to update the UI. Additionally, it can perform operations such as fetching data from an API.
 class UserController(private val userModel: UserModel, private val userView: UserFragment) {
     // Method to fetch data from an API and update the Model and View accordingly
     fun fetchDataFromApi() {
         // Perform an API request to fetch user data
         // Once the response is received, update the Model and notify the View to update the UI
         // For example:
         ApiClient.getUserData { userData ->
             // Update the Model with the fetched data
             userModel.username = userData.username
             userModel.email = userData.email

             // Notify the View (UserFragment) to update the UI with the new data
             userView.updateUI(userModel)
         }
     }

     // Methods to handle user actions and update the Model accordingly
     fun onUsernameChanged(newUsername: String) {
         userModel.username = newUsername
     }

     fun onEmailChanged(newEmail: String) {
         userModel.email = newEmail
     }
 }
In this example, the
UserControlleris responsible for fetching data from an API using anApiClient, updating theUserModelwith the retrieved data, and notifying theUserFragment(View) to update the UI. TheUserFragmentcontains the necessary UI components and methods to display the data from theUserModelto the user.By following the MVC architecture, we achieve a clear separation of concerns. The Model focuses on data and business logic, the View handles UI presentation, and the Controller manages user interactions and data flow between the Model and the View. This separation allows for easier maintenance, code reuse, and scalability. Modifying the Model does not impact the View or Controller, and the View can be reused with different Controllers throughout the application. These benefits contribute to enhanced code organization, reusability, and overall robustness of the Android app.
Model-View-Presenter (MVP)
The MVP architectural pattern is widely used in Android app development to improve the code structure and testability. By dividing the app into Model, View, and Presenter components, MVP promotes the separation of concerns and enhances the overall design.
Model: The Model represents the data and business logic in the application. It handles data retrieval, storage, and manipulation, as well as implementing any business rules or algorithms. The Model component ensures the integrity and consistency of the app's data.
View: The View represents the user interface (UI) of the application. It focuses on displaying data to the user and capturing user interactions. In MVP, the View is passive and doesn't contain any business logic. It communicates with the Presenter to update the UI and receive user input.
Presenter: The Presenter acts as the middleman between the Model and the View. It receives user interactions from the View, retrieves data from the Model, and updates the View accordingly. The Presenter contains the app's logic, making decisions and coordinating data flow. It ensures that the View remains decoupled from the Model.
Roles and Responsibilities:
Model: The Model handles data operations, including retrieval, storage, and manipulation. It encapsulates business logic and notifies the Presenter of any data changes.
View: The View is responsible for presenting data to the user and capturing user interactions. It delegates UI-related tasks to the Presenter and provides methods for the Presenter to update the UI and receive user input.
Presenter: The Presenter acts as the intermediary between the Model and the View. It receives user input from the View, fetches data from the Model, and updates the View accordingly. It contains the app's logic and orchestrates the interaction between the Model and the View.
Advantages of MVP:
Improved Testability: MVP enhances testability by separating the UI logic (View) from the business logic (Presenter and Model). This allows for easier unit testing of the Presenter, as it can be tested independently of the View and Model.
Decoupling of UI Logic: MVP reduces the coupling between the UI and the underlying business logic. The View becomes a passive interface, delegating UI-related tasks to the Presenter. This separation makes the codebase more modular and maintainable.
Scalability and Reusability: MVP's separation of concerns enables easier code maintenance and scalability. The View can be reused with different Presenters, and the business logic in the Presenter can be modified without impacting the UI.
Enhanced Code Organization: MVP promotes a clear separation of responsibilities, making the codebase more organized and easier to understand.
By adopting the MVP architectural pattern, Android developers can achieve improved testability, decoupling of UI logic, and a more modular and maintainable codebase. MVP provides a solid foundation for building robust and scalable Android applications.
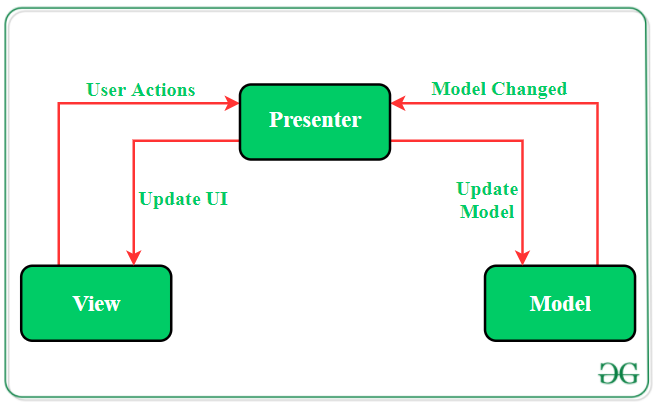
The source image you can find here: https://www.geeksforgeeks.org/mvp-model-view-presenter-architecture-pattern-in-android-with-example/
Here's a simplified version of the code example that illustrates the implementation of the MVP (Model-View-Presenter) architectural pattern in an Android app for fetching data from an API and displaying it in a Fragment.
Model
The
DataRepositoryinterface defines a contract for fetching data from the API. It includes a methodfetchDataFromApithat takes aDataCallbackas a parameter. This interface abstracts the data retrieval process and allows for flexibility in implementing different data sources or APIs.interface DataRepository { fun fetchDataFromApi(callback: DataCallback) } interface DataCallback { fun onDataFetched(data: List<String>) fun onFetchError(error: String) } // Implementation of the DataRepository interface class DataRepositoryImpl : DataRepository { override fun fetchDataFromApi(callback: DataCallback) { // Fetch data from the API and handle the response } }Presenter
The
DataPresenterclass acts as the mediator between the Model and the View. It implements theDataCallbackinterface, which provides methods for handling the fetched data or any errors. The presenter maintains a reference to theDataViewinterface, representing the View component.The presenter has several responsibilities:
It attaches and detaches the View using the
attachViewanddetachViewmethods, respectively. This ensures that the presenter can communicate with the View and update the UI.The
fetchDatamethod triggers the data fetching process. It notifies the View to display a loading indicator and then calls thefetchDataFromApimethod of theDataRepositoryto retrieve the data asynchronously.Depending on the result, the presenter notifies the View to hide the loading indicator and either displays the fetched data or show an error message.
    class DataPresenter(private val dataRepository: DataRepository) : DataCallback {
        private var view: DataView? = null

        fun attachView(view: DataView) {
            this.view = view
        }

        fun detachView() {
            view = null
        }

        fun fetchData() {
            view?.showLoading()
            dataRepository.fetchDataFromApi(this)
        }

        override fun onDataFetched(data: List<String>) {
            view?.hideLoading()
            view?.showData(data)
        }

        override fun onFetchError(error: String) {
            view?.hideLoading()
            view?.showError(error)
        }
    }
View
The
DataViewinterface defines the contract for UI operations related to data display. TheDataFragmentclass implements this interface and serves as the Fragment responsible for displaying the fetched data.In the
onCreateViewmethod of the Fragment, the layout is inflated, and theDataPresenterandDataRepositoryinstances are initialized. TheDataPresenteris attached to the View in theonViewCreatedmethod to establish the communication channel between them.The View implements the methods defined in the
DataViewinterface:The
showLoadingandhideLoadingmethods control the visibility of the loading indicator, providing visual feedback to the user during the data fetching process.The
showDatamethod is responsible for displaying the fetched data on the UI.The
showErrormethod handles the display of error messages if any issues occur during data retrieval.
In the onDestroyView method, the presenter is detached from the View to prevent memory leaks and ensure proper cleanup.
    interface DataView {
        fun showLoading()
        fun hideLoading()
        fun showData(data: List<String>)
        fun showError(error: String)
    }

    class DataFragment : Fragment(), DataView {
        private lateinit var presenter: DataPresenter

        override fun onCreateView(inflater: LayoutInflater, container: ViewGroup?, savedInstanceState: Bundle?): View? {
            // Inflate the layout for this fragment
            val view = inflater.inflate(R.layout.fragment_data, container, false)

            // Initialize presenter and data repository
            val dataRepository = DataRepositoryImpl()
            presenter = DataPresenter(dataRepository)

            return view
        }

        override fun onViewCreated(view: View, savedInstanceState: Bundle?) {
            super.onViewCreated(view, savedInstanceState)

            // Attach the view to the presenter
            presenter.attachView(this)

            // Fetch data from API
            presenter.fetchData()
        }

        override fun onDestroyView() {
            super.onDestroyView()

            // Detach the view from the presenter
            presenter.detachView()
        }

        override fun showLoading() {
            // Show loading indicator
        }

        override fun hideLoading() {
            // Hide loading indicator
        }

        override fun showData(data: List<String>) {
            // Display the data in the UI
        }

        override fun showError(error: String) {
            // Show error message in the UI
        }
    }
By following the MVP pattern, this code example separates the concerns of data retrieval, UI updating, and business logic. The Model handles data fetching, the Presenter coordinates the communication, and the View takes care of rendering the UI based on the Presenter's instructions. This promotes a clean and maintainable architecture, improves testability, and decouples the UI logic from the underlying data sources.
Model-View-ViewModel (MVVM)
The MVVM architectural pattern consists of three main components: Model, View, and ViewModel. Each component has specific responsibilities and interacts with others to achieve separation of concerns and facilitate easier data binding. Here's a breakdown of each component:
Model: The Model represents the data and business logic of the application. It encapsulates data sources like APIs or databases and provides methods to interact with and manipulate the data. The Model component focuses on data retrieval, updates, and performing essential operations.
View: The View represents the user interface (UI) of the application. It displays the data to the user and captures user input. In MVVM, the View is responsible for rendering the UI based on the state of the ViewModel. It observes changes in the ViewModel and updates the UI accordingly. The View is designed to be passive and free from any business logic.
ViewModel: The ViewModel acts as an intermediary between the Model and the View. It exposes the necessary data and operations that the View needs to display and interact with the data. The ViewModel holds the state of the View and provides methods for handling user actions and updating the Model. It does not have direct knowledge of the View but communicates with it through data binding or events. The ViewModel is responsible for transforming and preparing the data from the Model to be presented by the View.
The interactions between these components are as follows:
The View observes changes in the ViewModel, often through data binding, and updates the UI accordingly. This allows the UI to automatically reflect any changes in the underlying data without requiring explicit manual updates.
The ViewModel retrieves data from the Model, performs any necessary transformations or business logic, and exposes the data in a format suitable for the View. It communicates with the Model to retrieve or update data as needed.
The View notifies the ViewModel about user interactions or actions, such as button clicks or text input. The ViewModel then handles these interactions, performs any required data manipulation or updates, and may communicate back with the Model if necessary.
The benefits of using MVVM include:
Separation of concerns: MVVM promotes a clear separation between UI logic (View) and business logic (ViewModel). This separation improves code maintainability, readability, and testability by reducing the complexity of having the two tightly coupled.
Easier data binding: MVVM supports data binding frameworks, allowing for seamless synchronization between the View and ViewModel. This eliminates the need for manual UI updates, making the code cleaner and reducing potential sources of errors.
Improved reusability: The ViewModel can be designed to be reusable across multiple Views. This promotes code modularity, reduces duplication, and simplifies development and maintenance.
Testability: MVVM facilitates unit testing by isolating the UI logic in the ViewModel. This enables easier testing of the ViewModel's behavior, data transformations, and interactions with the Model, leading to more reliable and robust code.
By following the MVVM pattern, developers can achieve a well-organized architecture that promotes the separation of concerns, enables easier data binding, improves reusability, and enhances testability, resulting in more maintainable and scalable applications.
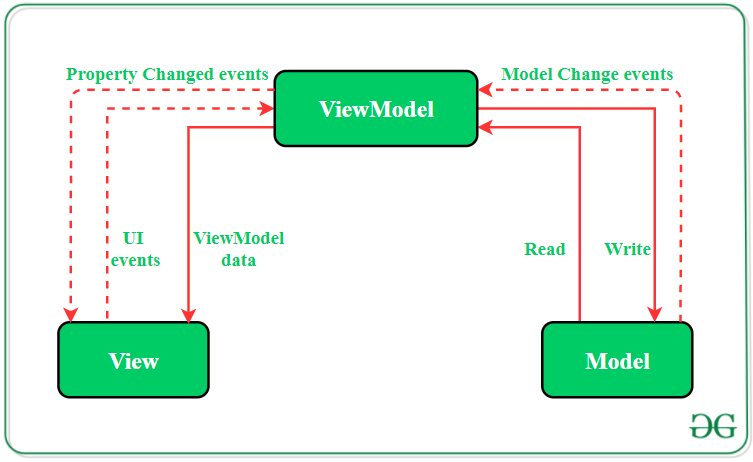
The resource image can find here: https://www.geeksforgeeks.org/mvvm-model-view-viewmodel-architecture-pattern-in-android/
Here's an example of how MVVM can be implemented in an Android app using Kotlin:
- Model (Data class representing a User):
data class User(val id: Int, val name: String, val email: String)
- ViewModel:
import androidx.lifecycle.ViewModel
import androidx.lifecycle.viewModelScope
import kotlinx.coroutines.Dispatchers
import kotlinx.coroutines.launch

class UserViewModel(private val userRepository: UserRepository) : ViewModel() {
    private val _users = MutableLiveData<List<User>>()
    val users: LiveData<List<User>> get() = _users

    fun fetchUsers() {
        viewModelScope.launch(Dispatchers.IO) {
            val fetchedUsers = userRepository.getUsers()
            _users.postValue(fetchedUsers)
        }
    }
}
- Repository (Data source):
class UserRepository {
    fun getUsers(): List<User> {
        // Fetch users from API or database
        // Return the list of users
    }
}
- View (Fragment):
class UserFragment : Fragment() {
    private lateinit var userViewModel: UserViewModel

    override fun onCreateView(inflater: LayoutInflater, container: ViewGroup?, savedInstanceState: Bundle?): View? {
        val binding: FragmentUserBinding = DataBindingUtil.inflate(inflater, R.layout.fragment_user, container, false)
        val view = binding.root

        userViewModel = ViewModelProvider(this).get(UserViewModel::class.java)
        binding.viewModel = userViewModel
        binding.lifecycleOwner = this

        userViewModel.fetchUsers()

        userViewModel.users.observe(viewLifecycleOwner, Observer { users ->
            // Update the UI with the list of users
        })

        return view
    }
}
In this example, the ViewModel (UserViewModel) communicates with the Repository (UserRepository) to fetch the list of users. The ViewModel exposes the list of users through a LiveData object (users), which the View (UserFragment) observes. When the data changes, the View updates its UI accordingly. Data binding can be used in the XML layout file (fragment_user.xml) to bind the UI elements directly to the ViewModel properties.
This MVVM implementation promotes the separation of concerns, as the ViewModel handles the logic and data transformations, while the View focuses on displaying the data and capturing user interactions. The use of LiveData and data binding simplifies the synchronization between the View and ViewModel, resulting in cleaner and more maintainable code.
Please note that this is a simplified example, and in a real-world scenario, additional components and architectural considerations may be involved.
Choosing the Right Architecture
When it comes to choosing the right architecture for a software project, it's important to carefully evaluate different options and consider various factors. Let's explore these factors in detail:
Compare and contrast the MVC, MVP, and MVVM architectures:
Model-View-Controller (MVC): MVC separates an application into three components: Model, View, and Controller. The Model represents the data and business logic, the View handles the UI presentation, and the Controller manages the communication between the Model and View.
Model-View-Presenter (MVP): MVP also divides an application into three components: Model, View, and Presenter. The Model contains the data and business logic, the View displays the UI, and the Presenter acts as an intermediary, handling the communication between the Model and View.
Model-View-ViewModel (MVVM): MVVM breaks down an application into three components: Model, View, and ViewModel. The Model holds the data and business logic, the View represents the UI, and the ViewModel provides the data and operations needed by the View.
Factors to consider when selecting the most appropriate architecture for a project:
Project requirements: Evaluate the complexity, size, and specific needs of the project. Smaller projects with straightforward requirements may benefit from a simpler architecture like MVC, while larger and more complex projects may require the separation of concerns offered by MVP or MVVM.
Team composition: Consider the skills and expertise of your development team. Some architectures may align better with their experience and preferences, enabling smoother development and maintenance.
Future scalability: Think about the potential for future enhancements and scalability. An architecture that supports modularity and extensibility, such as MVVM, can facilitate future changes without significant refactoring.
Guidelines for choosing the architecture based on project requirements, team composition, and future scalability:
Assess the project's complexity and size to determine the level of architectural separation required. Smaller projects with simpler requirements can benefit from the straightforwardness of MVC, while larger projects may demand the more structured approach of MVP or MVVM.
Consider the team's familiarity with different architectures. If your team has prior experience and expertise with a particular architecture, it can lead to improved productivity and code quality.
Evaluate the potential for future changes and scalability. If the project is expected to evolve or scale over time, selecting an architecture that promotes modularity and flexibility, such as MVVM, can facilitate easier enhancements and maintenance.
By carefully considering these factors and evaluating the specific needs of your project, team composition, and future goals, you can make an informed decision when selecting the most appropriate architecture for your software project.
Case Studies and Real-World Examples
When it comes to understanding the effectiveness of different architectural approaches, examining real-world case studies can provide valuable insights. Let's explore this further:
Case studies or real-world examples:
Case Study 1: "Coffee E-commerce App" - This Android app successfully implemented the MVVM architecture, utilizing data binding and ViewModel to separate UI logic from data and business logic. The outcome was improved code maintainability, testability, and modularity. Development time was reduced, and the team found it easier to add new features while keeping the codebase organized and scalable.
Case Study 2: "Exercise Diet Tracker" - The MVP architecture was adopted for this diet tracking app, decoupling the View and Presenter components. The result was enhanced unit testing capabilities, improved code readability, and better collaboration between developers and designers. The app exhibited high performance and responsiveness.
Benefits and lessons learned:
Improved code maintainability: All the case studies showcased the advantage of separating concerns within the chosen architectures. This led to better code maintainability, as the UI logic, data manipulation, and business logic were clearly distinguished. This separation made code understanding, debugging, and future enhancements more straightforward.
Testability: The chosen architectures enabled increased testability by allowing focused unit testing of individual components. This led to improved code coverage and overall app quality. Unit tests could be written for specific functionalities without being tightly coupled to the UI layer.
Collaboration and team efficiency: The architectures promoted collaboration among team members, as the responsibilities and interactions between components were well-defined. Developers and designers could work concurrently, focusing on their respective areas within the defined architectural boundaries. This resulted in enhanced team efficiency and productivity.
Scalability and adaptability: The case studies demonstrated that the chosen architectures provided scalability and adaptability to handle evolving project requirements. As the apps grew in complexity, the modular nature of the architectures allowed for the seamless addition of new features and integration with external APIs or libraries.
From these implementations, valuable lessons were learned. Thorough planning and architecture design upfront are crucial, considering the specific requirements of the project. It's essential to strike the right balance between architectural complexity and project size. Additionally, documenting the architectural decisions and facilitating knowledge sharing among team members is key to successful implementation and future maintenance.
These real-world case studies serve as practical examples, showcasing the benefits of the chosen architectures and offering insights for developers and teams looking to make informed architectural decisions in their Android app development projects.